

How To Clean Computer Cache In Windows 7
How to Clear Windows 7 Cache
This wikiHow teaches y'all how to clear your Windows 7 computer's diverse caches of information and temporary files. Open Start . Click the multicolored Windows logo in the bottom-left corner of the screen.
- What is enshroud? How to clear Cache in Windows 10
- How to clear the Cache in Windows 8?
Method ane of 4:
Clearing General Caches
-
Open First

. Click the multicolored Windows logo in the lesser-left corner of the screen.
-
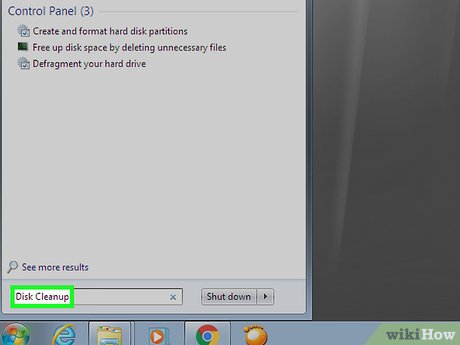
Type disk cleanup into Beginning. Doing so will search your computer for the Disk Cleanup program.
- If your mouse cursor doesn't appear in the text box at the bottom of Start when you open it, click the text box before typing.
-
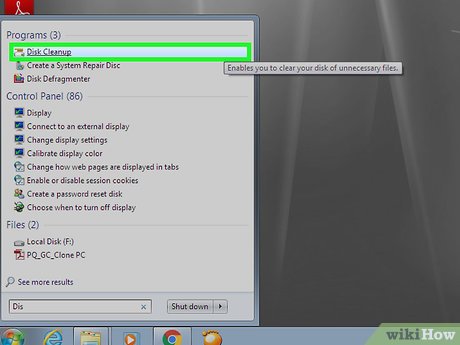
Click Disk Cleanup . This program's icon, which resembles a wink drive with a castor on information technology, should be at the tiptop of the Start menu. The Disk Cleanup program will open.
- You may have to click the Disk Cleanup icon once it appears at the bottom of the screen to open up the Deejay Cleanup window.
-
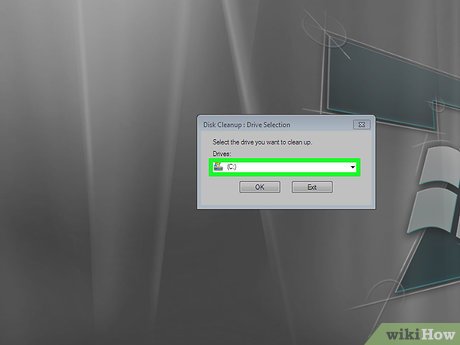
Check every box in the Disk Cleanup window. Click the checkbox to the left of each detail in the Deejay Cleanup window, scrolling downward once you accomplish the bottom of the window to view more than options if necessary.
-
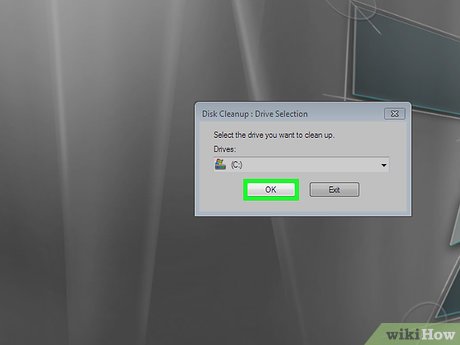
Click OK . It'south at the bottom of the window.
-
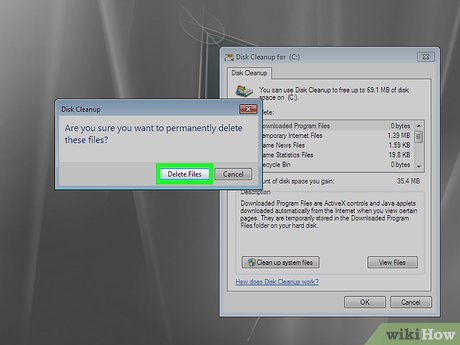
Click Delete Files when prompted. Deejay Cleanup will begin deleting temporary files from places like the "Thumbnails" cache and the Recycle Bin cache.
- In one case this process is complete, Disk Cleanup will close.
Method ii of iv:
Clearing App Information Files
-

Open Kickoff

. Click the multicolored Windows logo in the bottom-left corner of the screen.
-
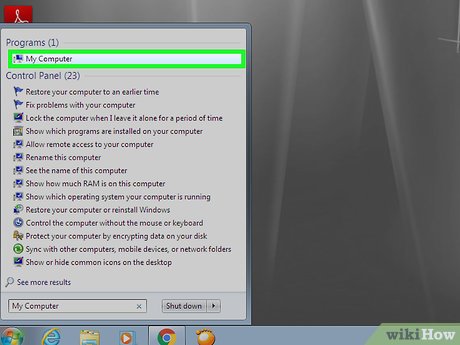
Click My Computer . It's a tab on the right side of the Start window. This will open up the My Computer window.
- If y'all don't see the My Computer tab here, blazon my computer into Start, then click My Calculator at the top of the Start window.
-
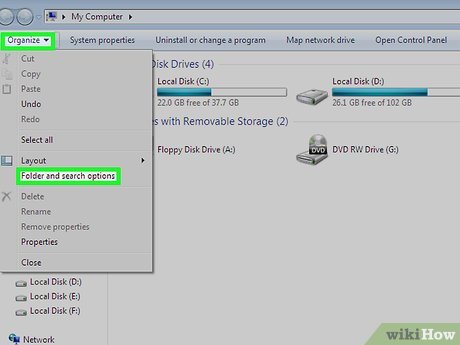
Enable viewing for hidden files and folders. To do and so from the My Computer window:
- Click the Organize tab in the upper-left corner of the window.
- Click Binder and search options in the resulting drop-down carte du jour.
- Click the View tab.
- Check the "Evidence hidden files, folders, and drives" box under the "Hidden files and folders" section of the "Files and folders" section.
- Click OK at the bottom of the window.
-
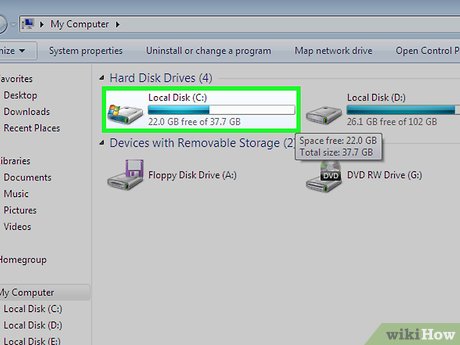
Double-click your hard drive's name. Below the "Hard disk drive Drives" heading, double-click the Local Disk choice.
- The hard drive's alphabetic character is usually "C", stylized as (C:).
-
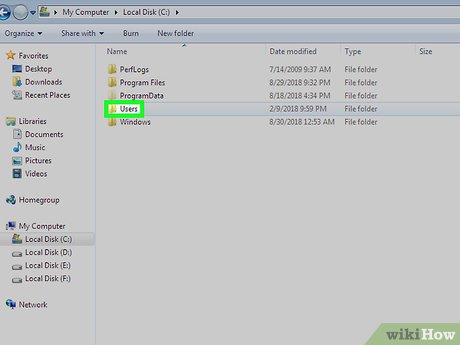
Double-click the Users binder. Y'all'll find it near the top of the window.
-
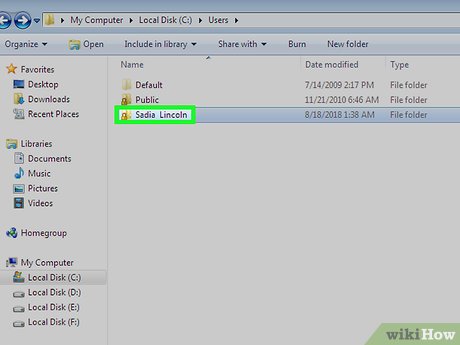
Double-click your user folder. This volition usually be a folder with the first few messages of your proper name or Microsoft account accost.
-
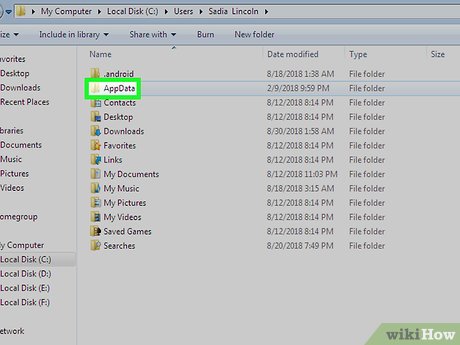
Double-click the AppData folder. Information technology's in the eye of the window, though you may take to scroll down to discover it if the window isn't in full-screen style.
-

Double-click the Local binder. You'll find this selection most the pinnacle of the window.
-
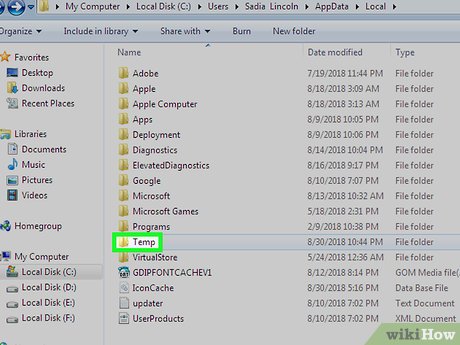
Scroll downwards and select the Temp folder. Click in one case this folder to select it.
-
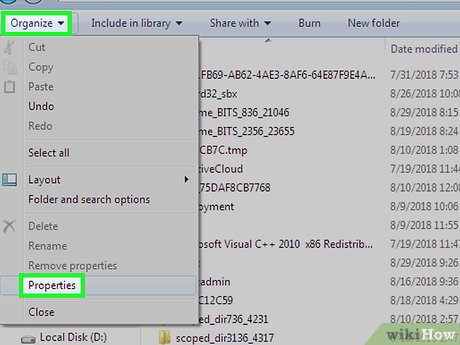
Remove the read-just protection from the folder. To practise so:
- Click the Organize tab.
- Click Backdrop
- Uncheck the "Read-only" box.
- Click Apply
- Click OK when prompted.
- Click OK
-
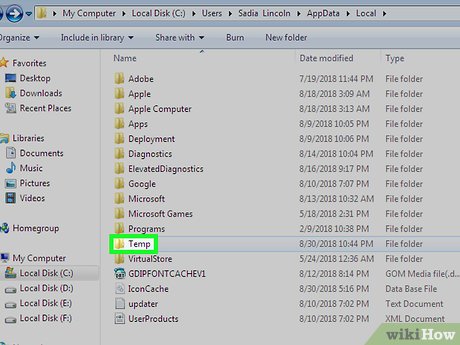
Double-click the Temp binder. It should open up.
-
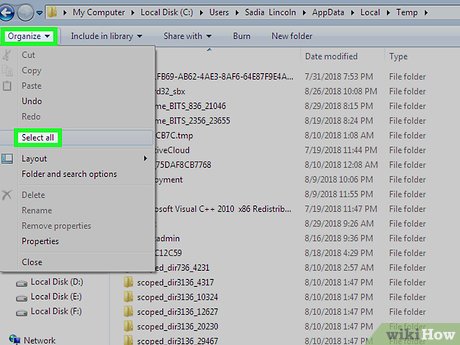
Select the folder's contents. Click one item in the binder, so press Ctrl+A . Alternatively, you can click Organize and then click Select all.
-
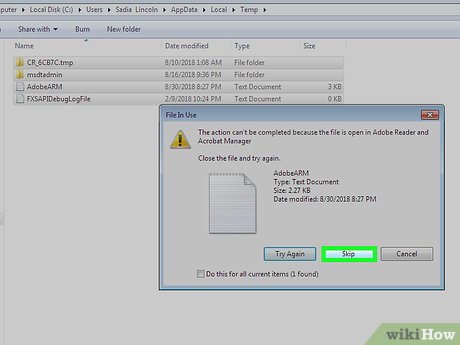
Delete the folder's contents. Printing the Del fundamental on your keyboard.
- A few of the files in the Temp folder may be in use, or system files, meaning that you can't delete them. If prompted, check the "Do this for all current items" box and click Skip.
-
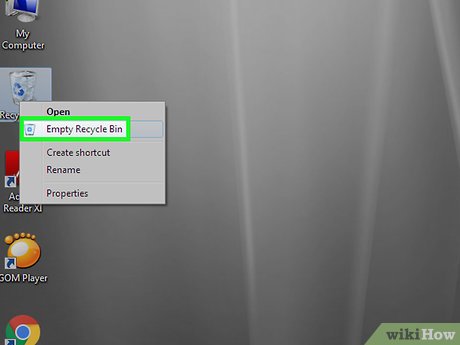
Empty the Recycle Bin . Doing so will completely remove the deleted files from your computer.
Method 3 of four:
Clearing Internet Explorer Files
-
Open up Start
. Click the multicolored Windows logo in the lesser-left corner of the screen.
-
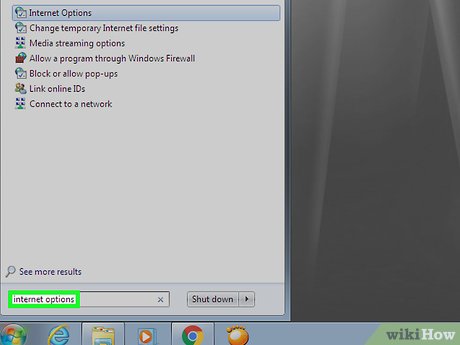
Blazon in cyberspace options. This volition search your computer for the Cyberspace Options program.
- If your mouse cursor doesn't appear in the text box at the lesser of Start when you open it, click the text box before typing.
-
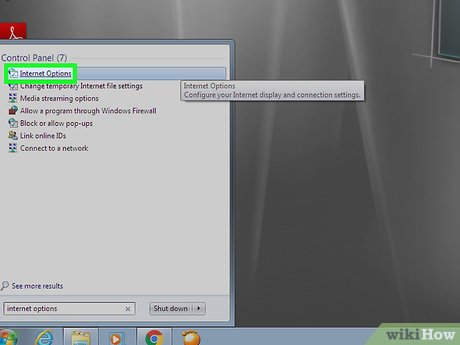
Click Net Options . It should be at the top of the Start menu. The Internet Options window volition open.
-
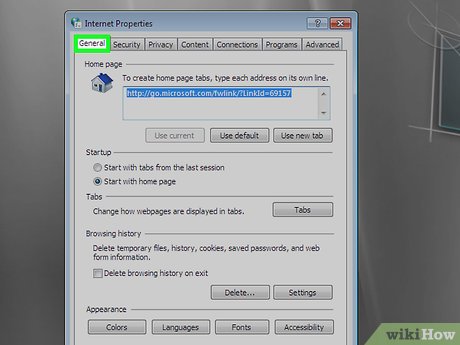
Click the General tab. This is at the top of the window.
-
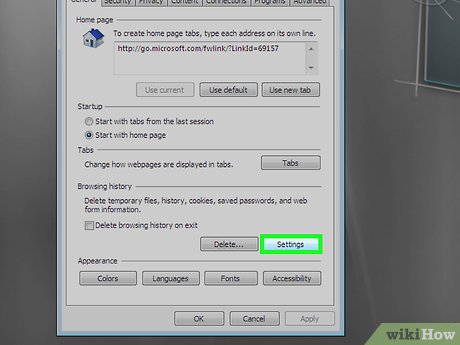
Click Settings . Information technology's in the lower-right side of the "Browsing history" section.
-
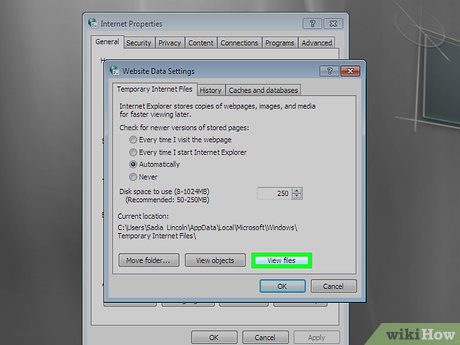
Click View files . Yous'll find it near the bottom-right side of the window. A new window containing all of your Internet Explorer buried files will open.
-
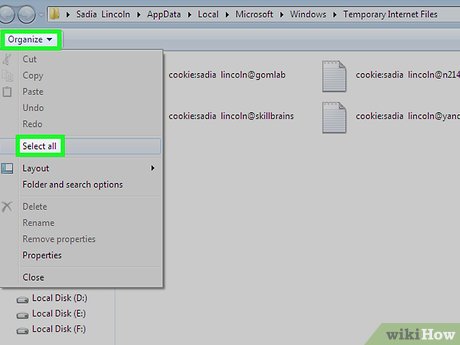
Select the binder's contents. Click i detail in the folder, and so press Ctrl+A . Alternatively, you can click Organize and and then click Select all.
-
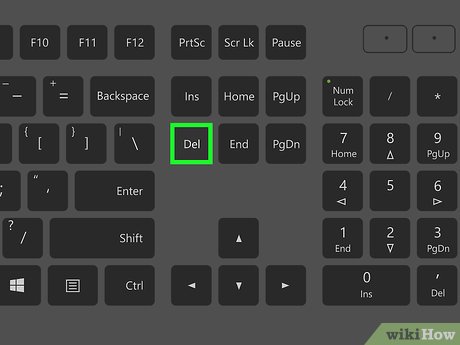
Delete the folder's contents. Press the Del key on your keyboard.
-

Empty the Recycle Bin . Doing and then will completely remove the deleted files from your calculator.
Method four of 4:
Clearing the DNS Cache
-

Open up Start

. Click the multicolored Windows logo in the bottom-left corner of the screen.
- Clearing the DNS cache solves problems with Internet connectivity, such as sites timing out.
-
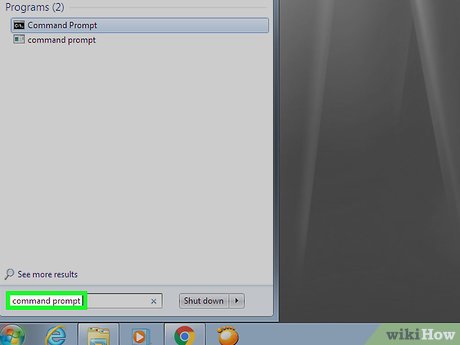
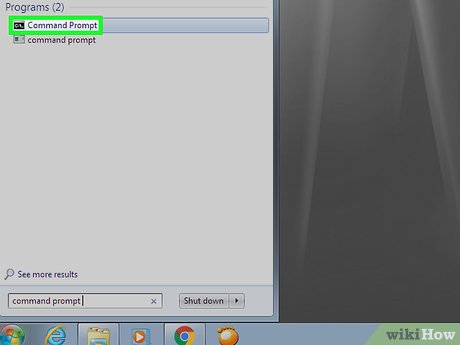
Type control prompt into Kickoff. This volition search your computer for the Command Prompt program.
- If your mouse cursor doesn't appear in the text box at the bottom of Start when you lot open it, click the text box before typing.
-
Right-click

Command Prompt. It should be at the peak of the First menu. A drop-down menu will appear.
- If your mouse doesn't have a right-click push, click the right side of the mouse, or use two fingers to click the mouse.
- If your computer uses a trackpad instead of a mouse, utilise two fingers to tap the trackpad or press the bottom-right side of the trackpad.
-
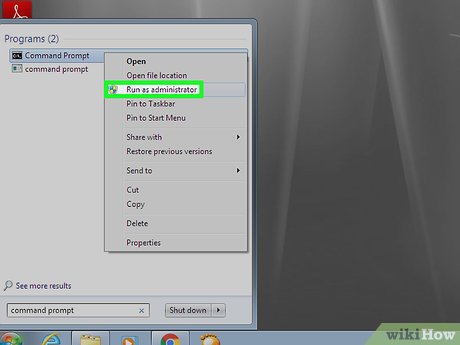
Click Run as Administrator . It's an option in the drop-down menu. This will open Command Prompt with Administrator privileges.
- You can't do this if you aren't using an Administrator account on your reckoner.
- You may need to click Yes when prompted earlier you can go on.
-
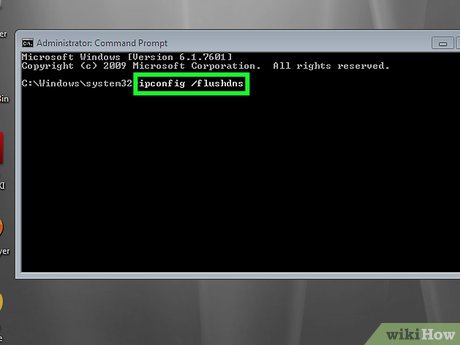
Enter the DNS affluent control. Type in ipconfig /flushdns and printing ↵ Enter .
-
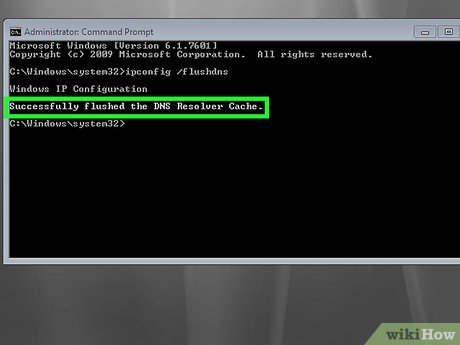
Wait for the confirmation control. You'll see a command saying "Successfully flushed the DNS Resolver Enshroud" appear if the flush is successful.
- You may need to restart your computer earlier you'll notice the changes to your Internet connection.
Source: https://tipsmake.com/how-to-clear-windows-7-cache
Posted by: petersallatish.blogspot.com
0 Response to "How To Clean Computer Cache In Windows 7"
Post a Comment